
 iPhone Snapshot with the cool Holga Look
However, all is not lost! You can still get this Holga look via Photoshop in a few easy steps. Here is a tutorial that will make your snapshots look just like a Holga photo. How cool is that?
I teach a black & white photography course (in addition to my digtial photography courses) where one of our assignments is to use a Holga to make great photographs. A Holga is a little toy plastic camera that uses 120 film (yes, Film!), has a plastic lens that gives a look that has distinctive blurred parts (or Bokeh, a Japanese term for blurry; they take this look to a high art) and a somewhat sharp focal point. It also has darkened corners, which is called a vignette (pronounced vinyet). If you have to have someone tell you how to pronounce a photographic term, this automatically places it in the intellectual category, which means that nobody can question its artistic value, so therefore, it must be art, right?
At any rate, Holgas have kind of a cult following in photography. If you've ever used one, you either hate it or love it; there isn't much gray area here.
Step 1: Open up your image in Photoshop and change the resolution to 150dpi without resampling it. On your menu bar it is Image- Image Size. Make sure that your file size doesn't get bigger.
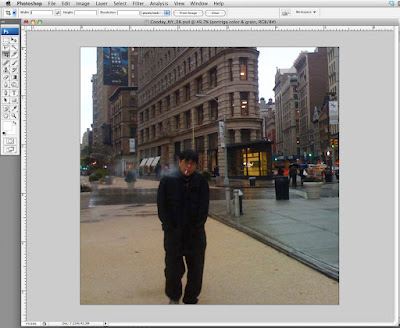
Step 2: Crop your image so that it is square. Holgas have square images, man. This is part of the look.
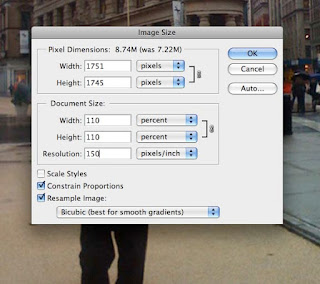
Step 3: Make the image larger by increasing its size by 110% in the height & width in Image Size. Change the inches to percent, as shown. Check the Resample Image box to allow the file to get bigger. Do this multiple times to make the photo larger (this is called Stair-step Interpolation). If you just jump to a larger size in one step, you get image degradation, so don't even think of doing this.
Step 4: Change it to black & white by going to the menu bar, Image- Image Adjustments- Hue/Saturation. Set the saturation to -100; this will change it to black & white while keeping it an RGB file. This is part of the coolness factor; b&w rules, man.At any rate, Holgas have kind of a cult following in photography. If you've ever used one, you either hate it or love it; there isn't much gray area here.
Here Goes:
Step 1: Open up your image in Photoshop and change the resolution to 150dpi without resampling it. On your menu bar it is Image- Image Size. Make sure that your file size doesn't get bigger.
Step 2: Crop your image so that it is square. Holgas have square images, man. This is part of the look.
Step 3: Make the image larger by increasing its size by 110% in the height & width in Image Size. Change the inches to percent, as shown. Check the Resample Image box to allow the file to get bigger. Do this multiple times to make the photo larger (this is called Stair-step Interpolation). If you just jump to a larger size in one step, you get image degradation, so don't even think of doing this.


 Optional: Do any image editing here. I thought that the lights were kind of distracting, so I just waved my magic wand and got rid of them. Cool.
Step 5: Make the surrounding area soft focus. This is a very subjective step and you can go whereever you want with your settings. Like, whatever, man. Here is my before and after. Just select the area you want to keep sharp with the Ellptical Marquee tool. The circular one. I just selected Jesse, inverted the selection and feathered it by around 55 pixels to give it a soft edge. 55 is my lucky number today. Then you go to the menu for Filter- Blur- Gaussian Blur. Mess around with various settings until it looks the way you want. An understanding of the poetic photographic nature of bokeh would be good here.

 Hey, you're almost there. It's square, b&w and soft focus around the edges. Cool.
 Step 6: Add the vignette; this is subjective too and can be played around with. Make a selection using the Elliptical Marquee tool again and make a circular selection that it looks kind of like this:
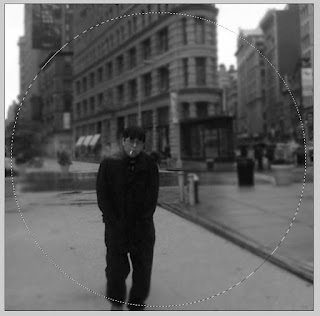 Do Select- Inverse so that the selection is inverted; just the corners will be selected. Feather it by at least 25 pixels- just enough so that the left, right, top & bottom are still selected.
 Do Select- Inverse so that the selection is inverted; just the corners will be selected. Feather it by at least 25 pixels- just enough so that the left, right, top & bottom are still selected.
 On the menu bar got to Image- Adjustments- Levels. Move the black triangle to the right to around 75 or so. This will make the corners darker. Cool.
Optional Step: Make the corner selection area larger with the feathering, soften it more than the previous step and make the level selection lighter. This will give you a graduated, larger vignette. You may also use the paint brush tool with a very large & feathered edge to burn in any part of the corners that may need to be made even darker. Adjust the opacity of the brush to make the burn look natural and not distracting.
Step 7: Deselect the image, then do a select all. Pump up the contrast for the entire image using the levels. You'll likely find that the entire image is a bit gray and needs some better blacks. This is subjective, do your best.
Optional Step: You may be finished now, unless you're a former lab rat and have preferences for various b&w papers. Personally, I've always had a preference for Agfa Portriga paper because it had rich brownish black tonal values (not sepia). I have a photoshop action that adds this Portriga tone; another wave of my magic wand and voilá! There it is.
 So why bother with a Holga & film if you can replicate the look using just an iPhone & Photoshop? Well, there is the intangible look you get from using various films, chemicals & darkroom papers. How your negative is both exposed and processed will give you a specific look that would be difficult to replicate in Photoshop. Throw in how this negative is printed onto enlarging paper and you have your second intangible; throw in the skills and artistry of the photographer and you have your third intangible. The easy answer? Artistry. It is as simple as that. Some photographers have a very specific look that they're able to squeeze out of the camera, film, enlarging paper and generally how they see the world. This is good enough for me.
On the other hand, it sure is fun to use the iPhone camera and play around with the images. The bottom line will always have to do with your visual aesthetic; that should drive all your choices. Have fun regardless.
(By the way, this is Jesse Cooday, my cousin who lives in NY. We had way too much fun there during our opening for the Identities exhibition that is still open at the Alaska House in SoHo.)

6 comments:
Thank you for visiting the blog, I appreciate comments. Did you find the blog as part of a search for iphone stuff?
thanks
Love the Holga look, I know i had one at one time, but after many moves it flew away.
I really like the Holga look too. My students make some pretty cool photos with it in the b&w photo class. I've shot some stuff with the Rollei too, by the way. I just haven't had time to scan the film.
Try also another iPhone app called "ToyCamera" and "OldCamera".
Concept is same as CameraBag. They also process image to vintage like.
Larry, came to your blog via your site via the LiveBook site, so how's that for connectivity!
As both an avid Holga shooter and a Japanese speaker, I just wanted to point out that the word is "bokeh" and not "boheh." Boke(h) doesn't simply mean blurred. The verb, "bokeru," usually in fact means "to be senile." From that you can guess the root of the "blurriness" meaning.
Anyway, keep up the good work!
Hello CamerAsian,
Good catch, man. Thank you for pointing out the typo. I have it spelled correctly in another place in the article-- sometimes I do miss typos, especially if spellcheck doesn't catch it either.
I didn't know the definition included the part about being senile, that does explain a lot, thank you for sharing that too.
I hear that the new liveBooks blog section is quite good!
thanks,
Larry
Post a Comment